iOS Native SDK Setup
Steps for adding the iZooto SDK to your iOS Native app with Swift or Objective-C.
Step 1: Requirements
- Your iZooto App ID. You can find it under Settings in your account.
- An iOS device (iPhone, iPad, iPod Touch) to test on. The XCode simulator doesn't support push notifications so you must test on a real device.
- A Mac with a new version of Xcode.
- An iOS Push Certificate.
Step 2: Add a Notification Extension Service
The iZootoNotificationServiceExtension allows your iOS application to receive rich notifications with images, buttons, and badges.
2.1 In Xcode Select File > New > Target.
2.2 Select Notification Service Extension, then press Next.

2.3. Enter the product name as iZootoNotificationExtendsServices and press Finish.

2.4. In the project navigator, select the top-level project directory and select the iZootoNotificationExtendsServices target in the project and targets list.
Unless you have a specific reason not to, you must set the Deployment Target to be iOS 10.

Deployment Target
Ensure that the Deployment Target is set to the same iOS version for both the main project and the iZooto Notification Service Extension.
2.5. Open NotificationService.swift (NotificationService.m for Objective C))under iZootoNotificationExtendsServices and replace the entire file's contents with the following code.
import UserNotifications
import iZootoiOSSDK

class NotificationService: UNNotificationServiceExtension {
  var contentHandler: ((UNNotificationContent) -> Void)?
  var bestAttemptContent: UNMutableNotificationContent?
  var receivedRequest: UNNotificationRequest!

  override func didReceive(_ request: UNNotificationRequest, withContentHandler contentHandler: @escaping (UNNotificationContent) -> Void) {
    print("Response",request)
    self.receivedRequest = request;
    self.contentHandler = contentHandler
    bestAttemptContent = (request.content.mutableCopy() as? UNMutableNotificationContent)

    if let bestAttemptContent = bestAttemptContent {
      iZooto.didReceiveNotificationExtensionRequest(bundleName :"<APP_BUNDLE_ID>", soundName: "<SOUND_NAME_HERE>", isBadge: <TRUE/FALSE>, request: receivedRequest, bestAttemptContent: bestAttemptContent,contentHandler: contentHandler)
    }
  }

  override func serviceExtensionTimeWillExpire() {
    if let contentHandler = contentHandler, let bestAttemptContent = bestAttemptContent {
      contentHandler(bestAttemptContent)
    }
  }
}
#import "NotificationService.h"

@interface NotificationService ()

@property (nonatomic, strong) void (^contentHandler)(UNNotificationContent *contentToDeliver);
@property (nonatomic, strong) UNMutableNotificationContent *bestAttemptContent;
@property (nonatomic, strong) UNNotificationRequest *receivedRequest;

@end

@implementation NotificationService

-(void)didReceiveNotificationRequest:(UNNotificationRequest *)request withContentHandler:(void (^)(UNNotificationContent * _Nonnull))contentHandler {
  self.contentHandler = contentHandler;
  self.receivedRequest = request;
  self.bestAttemptContent = [request.content mutableCopy];

  if (self.bestAttemptContent != nil) {
    [iZooto didReceiveNotificationExtensionRequestWithBundleName:@"<APP_BUNDLE_ID>" soundName:@"<SOUND_NAME_HERE>" isBadge: “<TRUE/FALSE>“ request:self.receivedRequest bestAttemptContent:self.bestAttemptContent contentHandler:self.contentHandler];
  }
  // self.contentHandler(self.bestAttemptContent);
}

-(void)serviceExtensionTimeWillExpire {
  // Called just before the extension will be terminated by the system.
  // Use this as an opportunity to deliver your "best attempt" at modified content, otherwise the original push payload will be used.
  self.contentHandler(self.bestAttemptContent);
}

@end
#import <UserNotifications/UserNotifications.h>

@import iZootoiOSSDK;

@interface NotificationService : UNNotificationServiceExtension

@end
Ignore any build errors at this point, step 3 will import iZooto which will resolve any errors.
Important
- Ensure to replace the <APP_BUNDLE_ID> with your app's Bundle ID.
- The <SOUND_NAME> should be left blank if you do want to use any custom sound for notifications.
- The
isBadgeparameter should be set to eitherTrueorFalsedepending on your use-case.
Step 3. Add App Groups
App Groups allow your app and the iZootoNotificationServiceExtension to communicate when a notification is received, even if your app is not active. This is required for badges and Confirmed Deliveries. Refer to our iOS SDK App Groups Setup guide for the step-by-step instructions for implementing this. This is a mandatory step for push notifications to work efficiently.
Step 4: Import the iZooto SDK into your XCode project
Swift Package Manager (Recommended)
The iZooto SDK can be added as a Swift Package (works with Objective-C as well).
Step 1. Select your Project > Package Dependencies > + button.
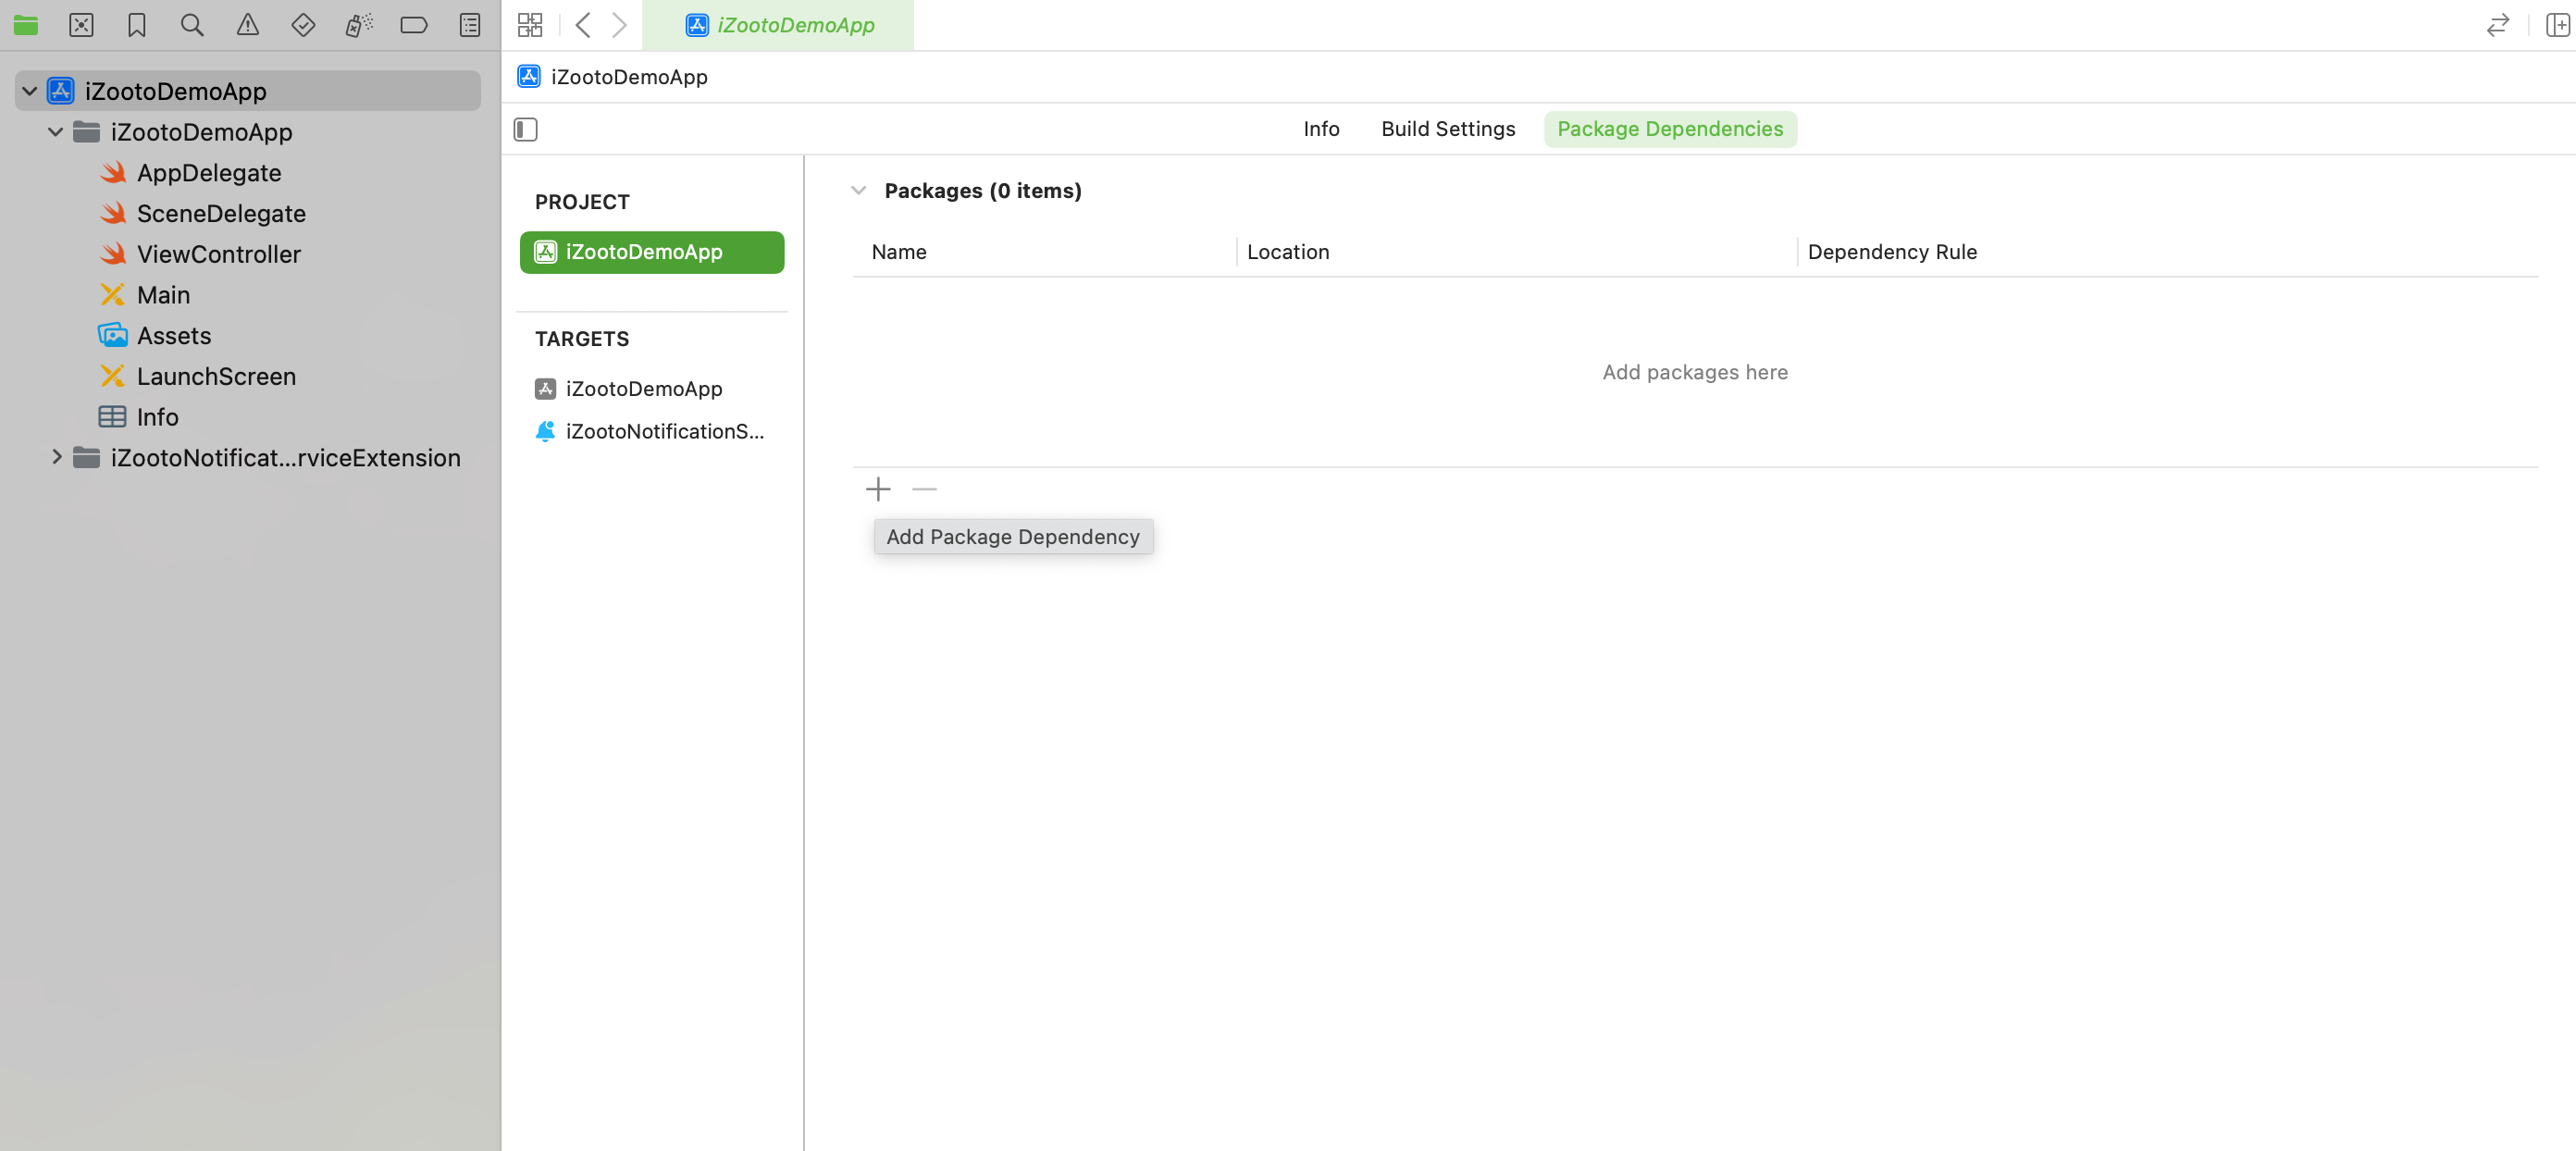
Step 2. Enter Package URL: https://github.com/iZooto-App-Push/iZooto-XCFramework
Make sure Dependency Rule is set to Up to Next Major Version
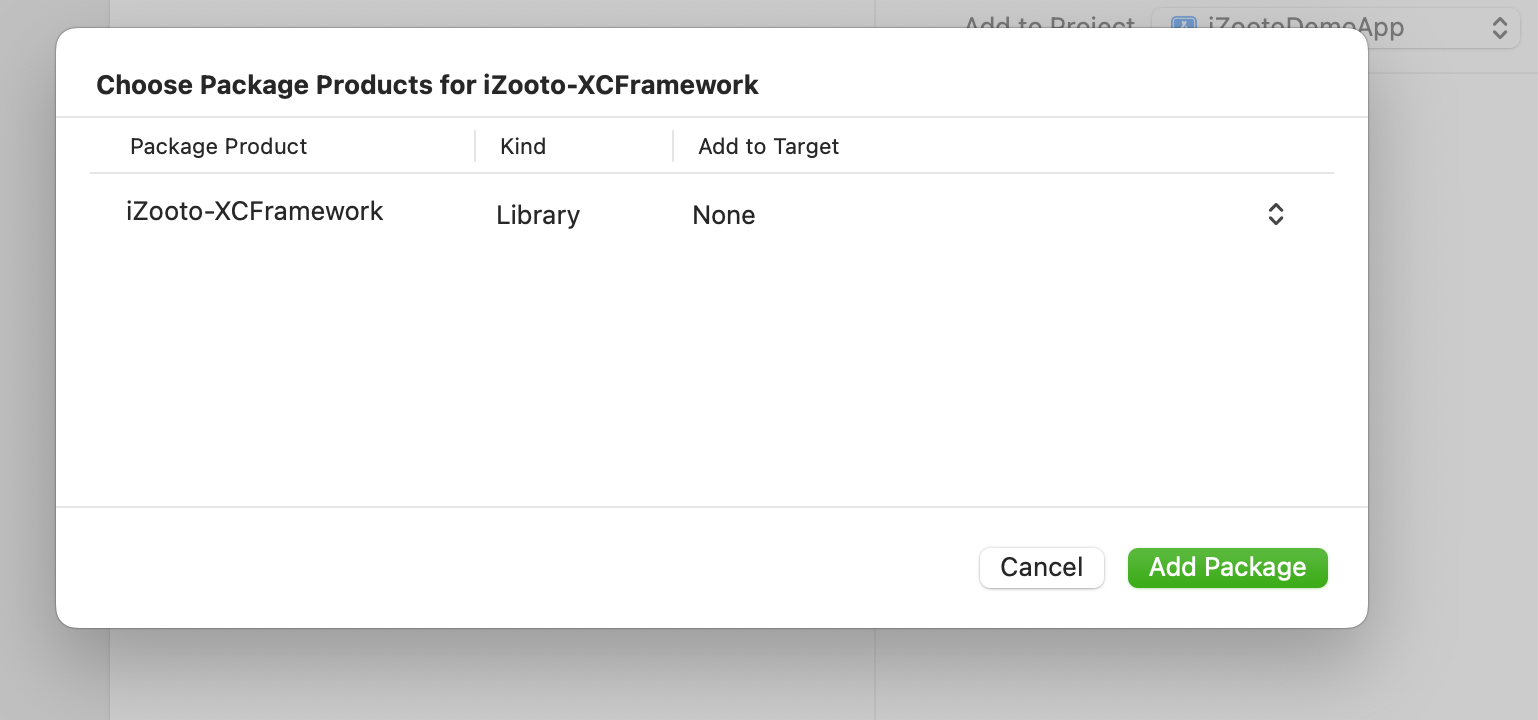
Step 3. Click Add Package.
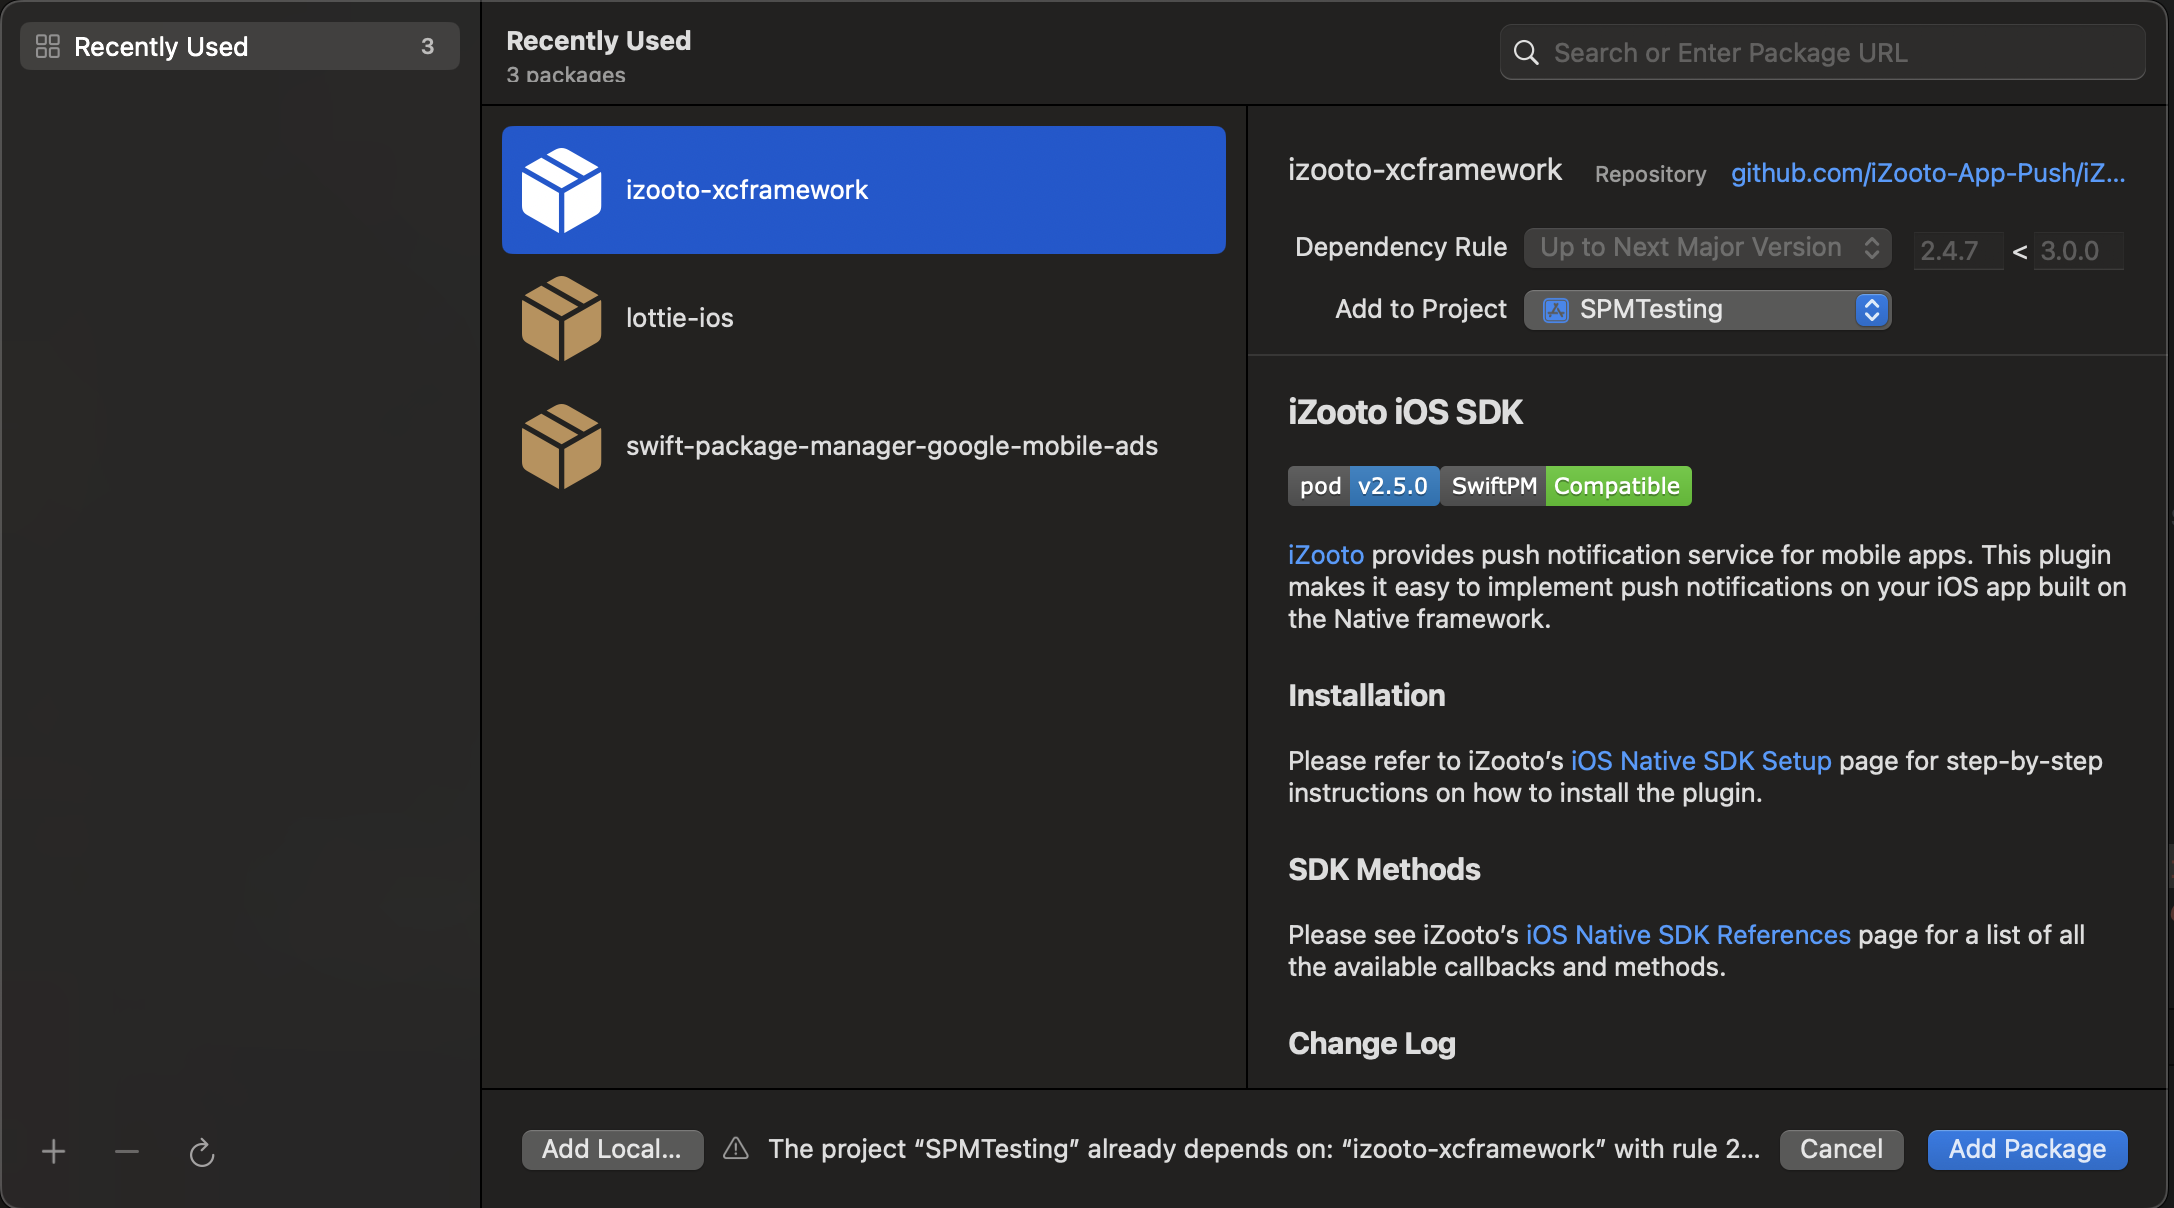
Click Add Package.
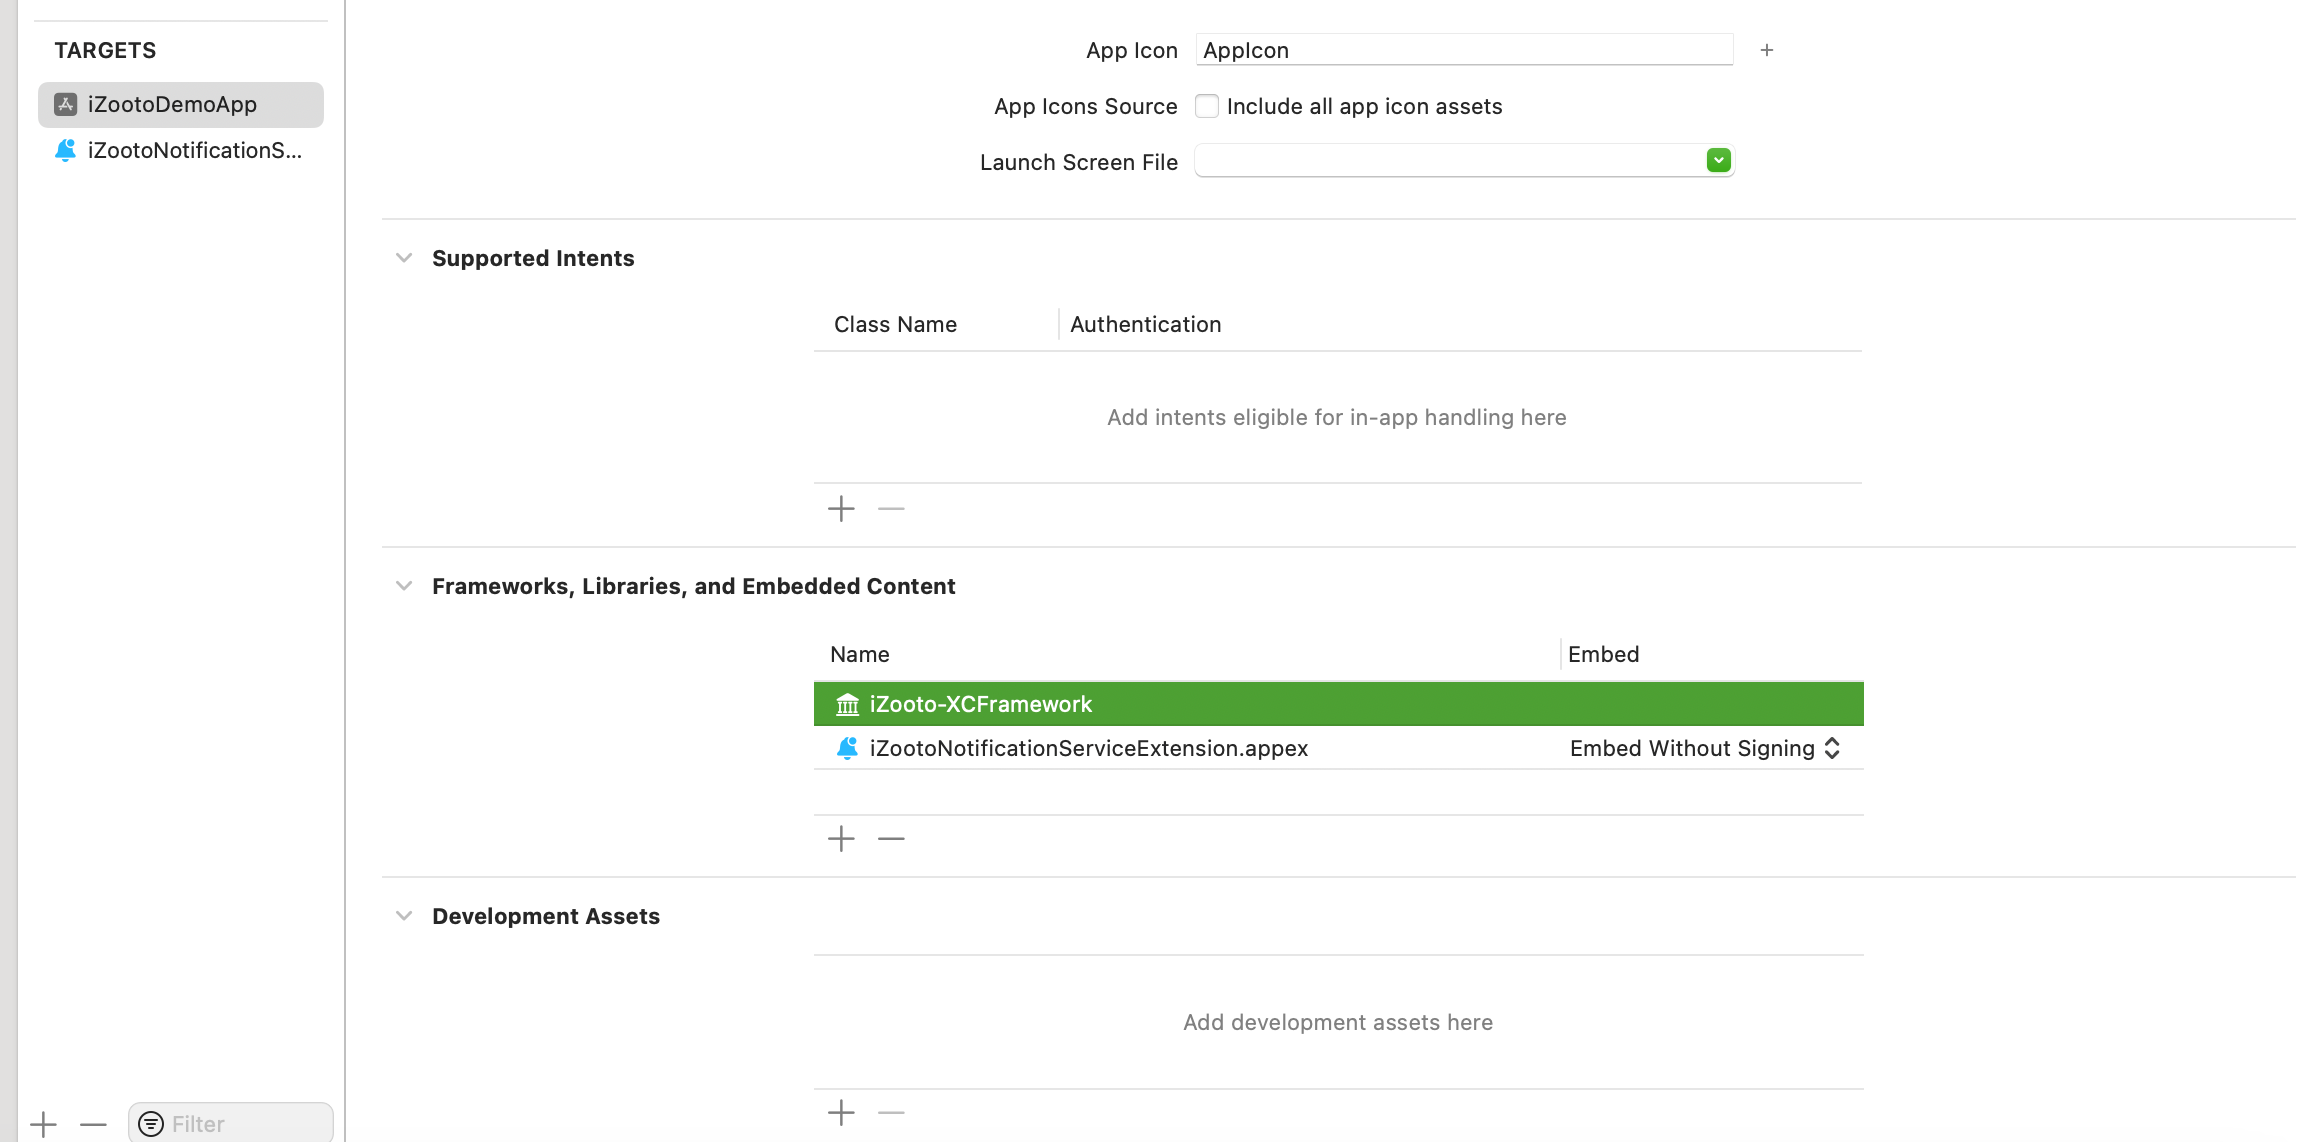
Step 4. Select your Application Target > General > Frameworks, Libraries, and Embedded Content.
Check to ensure the required iZootoFramework has been added.
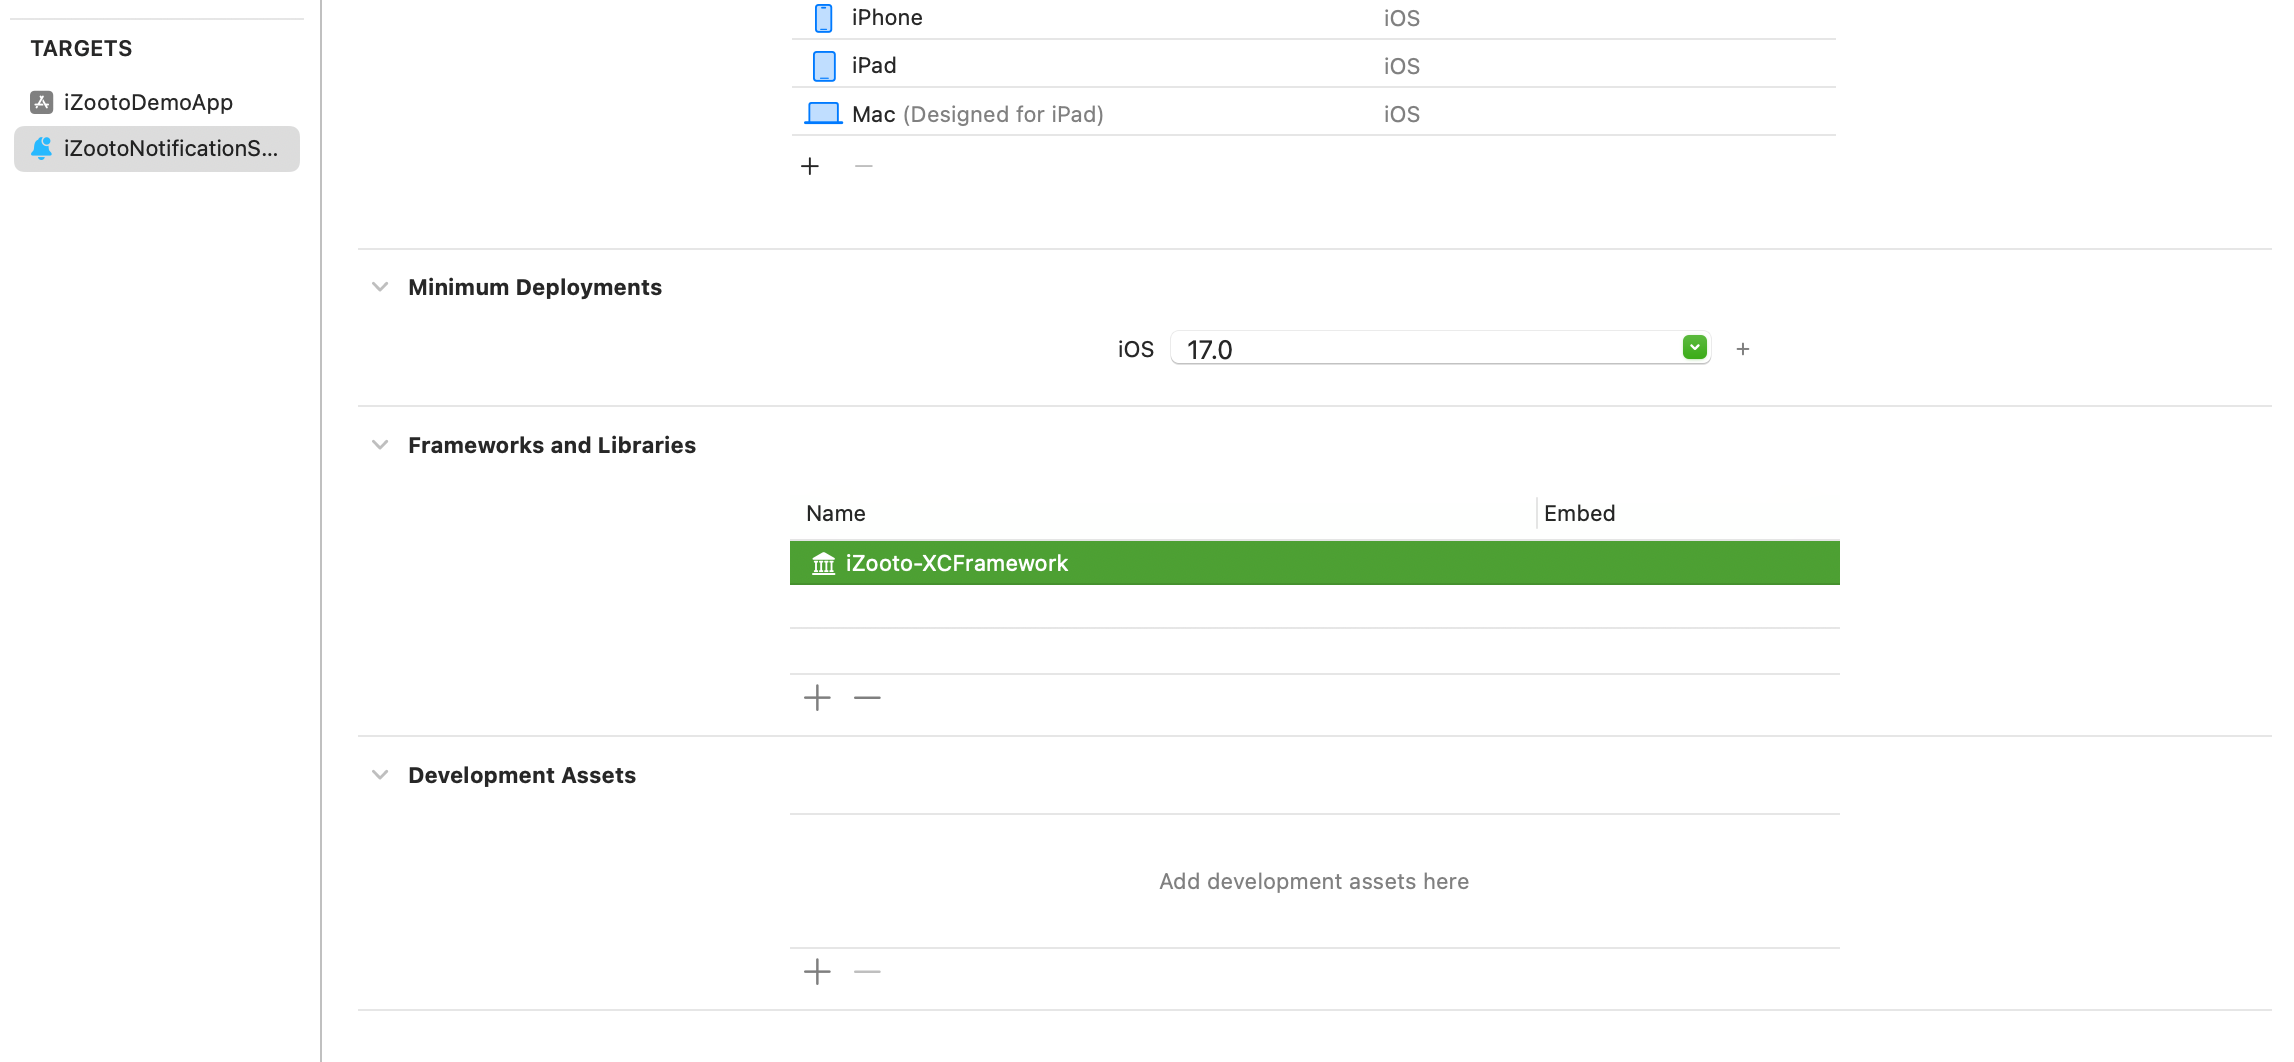
Step 5. Select the iZootoNotificationServiceExtension Target > General > Frameworks and Libraries.
Check to ensure the required iZootoFramework has been added.
CocoaPods
The iZooto SDK can be added with CocoaPods.
These instructions are for CocoaPods, the most common way to manage dependencies for XCode Projects.
Step 1. Make sure your current Xcode project is closed and in the project root, open terminal, and run
sudo gem install cocoapods.
Step 2. Run pod init from the terminal in your project directory.
Step 3. Open the newly created Podfile with your favorite code editor such as Sublime or type open Podfile from the terminal in your project directory.
Step 4. Add the iZooto dependency under your project name target
platform :ios, '12.0'

use_frameworks!
target 'your_project_name' do
 # only copy below line
  pod 'iZootoiOSSDK'

target 'iZootoNotificationExtendsServices' do
  # only copy below line
  pod 'iZootoiOSSDK'

end
end
Step 5. Run the following commands in your terminal in your project directory.
pod repo update
pod install
Open the newly created .xcworkspace file.
Make sure to always open the workspace from now on. You can also do this automatically by running xed . from the root of your project.
Step 5: Add Remote Notifications Capabilities
This step will make sure your project is able to receive remote notifications.
Only do this for the main application target.
Do not do this for the Notification Service Extension.
5.1. Select the root project, your main app target, and "Signing & Capabilities".
5.2. Select "All", then under "Background Modes" check "Remote notifications". You should see Push Notifications already provided.

5.3. If you do not see Push Notifications enabled, click "+ Capability" and double click "Push Notifications" to add it.

Step 6: Add the iZooto Initialization Code
Method 1 - Storyboard
Navigate to your AppDelegate file and add the iZooto initialization code to didFinishLaunchingWithOptions.
We would also be introducing additional methods.
Make sure to import the iZooto header.
import UIKit
import iZootoiOSSDK

@UIApplicationMain

class AppDelegate: UIResponder, UIApplicationDelegate, UNUserNotificationCenterDelegate, iZootoNotificationOpenDelegate, iZootoNotificationReceiveDelegate, iZootoLandingURLDelegate {
  // handle deeplink
  func onNotificationOpen(action: Dictionary<String, Any>) {
    print(action)
  }

  // Handle url
  func onHandleLandingURL(url: String) {
    // setlandingURL
    print("ClickURL",url)
  }

  // Notification Received
  func onNotificationReceived(payload: Payload) {
    print("Payload",payload.alert?.body! as Any )
  }

  var i = 0
  var window: UIWindow?

  func application(_ application: UIApplication, didFinishLaunchingWithOptions launchOptions: [UIApplication.LaunchOptionsKey: Any]?) -> Bool {
    // for setting
    let iZootoInitSettings = ["auto_prompt": true,"nativeWebview": true, "provisionalAuthorization":false]
    iZooto.initialisation(izooto_id: "<your_iZooto_app_id>", application: application, iZootoInitSettings:iZootoInitSettings)

    UNUserNotificationCenter.current().delegate = self
    iZooto.notificationOpenDelegate = self
    iZooto.notificationReceivedDelegate = self
    iZooto.landingURLDelegate = self
    iZooto.setBadgeCount(badgeNumber: 1)  // Use for custom badge count
      return true
  }

  func application(_ application: UIApplication, didRegisterForRemoteNotificationsWithDeviceToken deviceToken: Data) {
    iZooto.getToken(deviceToken: deviceToken)
  }

  @available(iOS 10.0, *)
  func userNotificationCenter(_ center: UNUserNotificationCenter, willPresent notification: UNNotification, withCompletionHandler completionHandler: @escaping (UNNotificationPresentationOptions) -> Void) 	{
    iZooto.handleForeGroundNotification(notification: notification, displayNotification: "None", completionHandler: completionHandler)
  }

  // @available(iOS 10.0, *)
  func userNotificationCenter(_ center: UNUserNotificationCenter, didReceive response: UNNotificationResponse, withCompletionHandler completionHandler: @escaping () -> Void) {
    iZooto.notificationHandler(response: response) //iZooto.notificationHandler
    completionHandler()
  }
}
#import <UIKit/UIKit.h>
#import <UserNotifications/UserNotifications.h>
@import iZootoiOSSDK;
@interface AppDelegate : UIResponder <UIApplicationDelegate,UNUserNotificationCenterDelegate,iZootoLandingURLDelegate,iZootoNotificationOpenDelegate,iZootoNotificationReceiveDelegate>
@property (strong, nonatomic) UIWindow * window;
@property(nonatomic, weak)id <iZootoLandingURLDelegate> landingURLDelegate;
@property(nonatomic, weak)id <iZootoNotificationOpenDelegate> notificationOpenDelegate;
@property(nonatomic, weak)id <iZootoNotificationReceiveDelegate> notificationReceivedDelegate;
@end
#import "AppDelegate.h"
@import iZootoiOSSDK;
@import UserNotifications;
@interface AppDelegate ()
@end
@implementation AppDelegate

-(BOOL)application:(UIApplication *)application didFinishLaunchingWithOptions:(NSDictionary *)launchOptions {
    //define settings
    NSMutableDictionary *izootoInitSetting = [[NSMutableDictionary alloc]init];
    [izootoInitSetting setObject:@YES forKey:@"auto_prompt"];
    [izootoInitSetting setObject:@NO forKey:@"nativeWebview"];
    [izootoInitSetting setObject:@NO forKey:@"provisionalAuthorization"];

    // initalise the iZooto SDK
    [iZooto initialisationWithIzooto_id:@"ede0c1cf52decdfdaf65c21d445f3832c475933e" application:application iZootoInitSettings:izootoInitSetting];
    iZooto.notificationReceivedDelegate = self;
    iZooto.landingURLDelegate = self;
    iZooto.notificationOpenDelegate = self;
    return YES;
}

-(void)application:(UIApplication *)application didRegisterForRemoteNotificationsWithDeviceToken:(NSData *)deviceToken {
  //Get Token from When enbale prompt allow
  [iZooto getTokenWithDeviceToken:deviceToken];
}

-(void)userNotificationCenter:(UNUserNotificationCenter *)center willPresentNotification:(UNNotification *)notification withCompletionHandler:(void (^)(UNNotificationPresentationOptions options))completionHandler{
  NSLog(@"Received");
  [iZooto handleForeGroundNotificationWithNotification:notification displayNotification:@"NONE" completionHandler:completionHandler];
}

-(void)application:(UIApplication *)application didFailToRegisterForRemoteNotificationsWithError:(NSError *)error {
}

-(void)userNotificationCenter:(UNUserNotificationCenter *)center
didReceiveNotificationResponse:(UNNotificationResponse *)response
     withCompletionHandler:(void (^)(void))completionHandler {
       [iZooto notificationHandlerWithResponse:response];
       completionHandler();
}

-(void)onHandleLandingURLWithUrl:(NSString * _Nonnull)url {
}

-(void)onNotificationOpenWithAction:(NSDictionary<NSString *,id> * _Nonnull)action {
  NSLog(@"NSString = %@", action);
}

-(void)onNotificationReceivedWithPayload:(Payload * _Nonnull)payload {
  NSLog(@"NSString = %@",payload);
}

@end
The iZooto_app_id will be available on the iZooto panel once you have submitted the APNS details. Refer to our guide on how to do this.
Method 2 - SwiftUI
If using SwiftUI, update your main 'APP_NAME'App.swift file and use the code below. Make sure to replace 'YOURAPP_NAME' with your app name.
import SwiftUI
import iZootoiOSSDK

@available(iOS 14.0, *)
@main
struct YOURAPP_NAME: App {
    @UIApplicationDelegateAdaptor(AppDelegate.self) var appDelegate

    var body: some Scene {
        WindowGroup {
            ContentView()
        }
    }
}

class AppDelegate:NSObject,UIApplicationDelegate,UNUserNotificationCenterDelegate {
    func application(_ application: UIApplication, didFinishLaunchingWithOptions launchOptions [UIApplication.LaunchOptionsKey : Any]? = nil) -> Bool {
        let iZootoInitSettings = ["auto_prompt": true,"nativeWebview": true, "provisionalAuthorization":false]
        iZooto.initialisation(izooto_id: "<iZooto_app_id>", application: application, iZootoInitSettings:iZootoInitSettings)
        UNUserNotificationCenter.current().delegate = self
        return true
    }

    func application(_ application: UIApplication, didRegisterForRemoteNotificationsWithDeviceToken deviceToken: Data) {
        iZooto.getToken(deviceToken: deviceToken)
    }

    @available(iOS 10.0, *)
    func userNotificationCenter(_ center: UNUserNotificationCenter, willPresent notification: UNNotification, withCompletionHandler completionHandler: @escaping (UNNotificationPresentationOptions) -> Void) {
        iZooto.handleForeGroundNotification(notification: notification, displayNotification: "None", completionHandler: completionHandler)
    }

    // @available(iOS 10.0, *)
    func userNotificationCenter(_ center: UNUserNotificationCenter, didReceive response: UNNotificationResponse, withCompletionHandler completionHandler: @escaping () -> Void) {
        iZooto.notificationHandler(response: response) //iZooto.notificationHandler
        completionHandler()
    }
}
Replace
iZooto_App_IDwith your iZooto ID.
This can be found under the Settings > General of your iOS Project on iZooto.
Step 7: Add Internet permission in your XCode Project.
Go to Info.plist, right-click Open As > Source Code. Add following lines after < /array > tag.
For Internet Permissions
<key>NSAppTransportSecurity</key>
	<dict>
			<key>NSAllowsArbitraryLoads</key>
		<true/>
	</dict>
Step 8: Run your app on a device and send yourself a notification.
Test your app on a physical iOS device to make sure it builds correctly. You should be prompted to subscribe to notifications and you should be able to send yourself a notification from the iZooto dashboard.
Make sure that you have configured APNS certificate corresponding to you iOS Project on iZooto.
Note that the iOS Simulator does not support receiving remote push notifications.
Done! You have successfully integrated iZooto's iOS SDK with your application.
If you need any assistance during onboarding, reach out to us at [email protected].
Step 9: Customize what your app does when a notification is clicked or received (Optional)
Notification Handlers
NotificationReceivedHandler - This will be called when a notification is received.
NotificationOpenedHandler - This will be called when a notification is tapped on.
Updated 8 months ago