Configuring RSS Auto Push Notifications for your Account
How to set up an RSS feed on your iZooto Account to send automatic notifications?
Setting up RSS Auto Push notifications for your website is a 2-step process:
- Adding the required RSS feed to the iZooto account.
- Configuring the notifications.
Once these prerequisites have been completed, follow the below steps to configure RSS Auto Push Notifications for your website.
The next steps would be to set up the RSS feed in your Account and configure the notifications. Follow the below steps to get started.
Setup
Step 1
Click on RSS Automation on the left side navigation bar.

Step 2
Then click on Connect RSS Feed.

Step 3
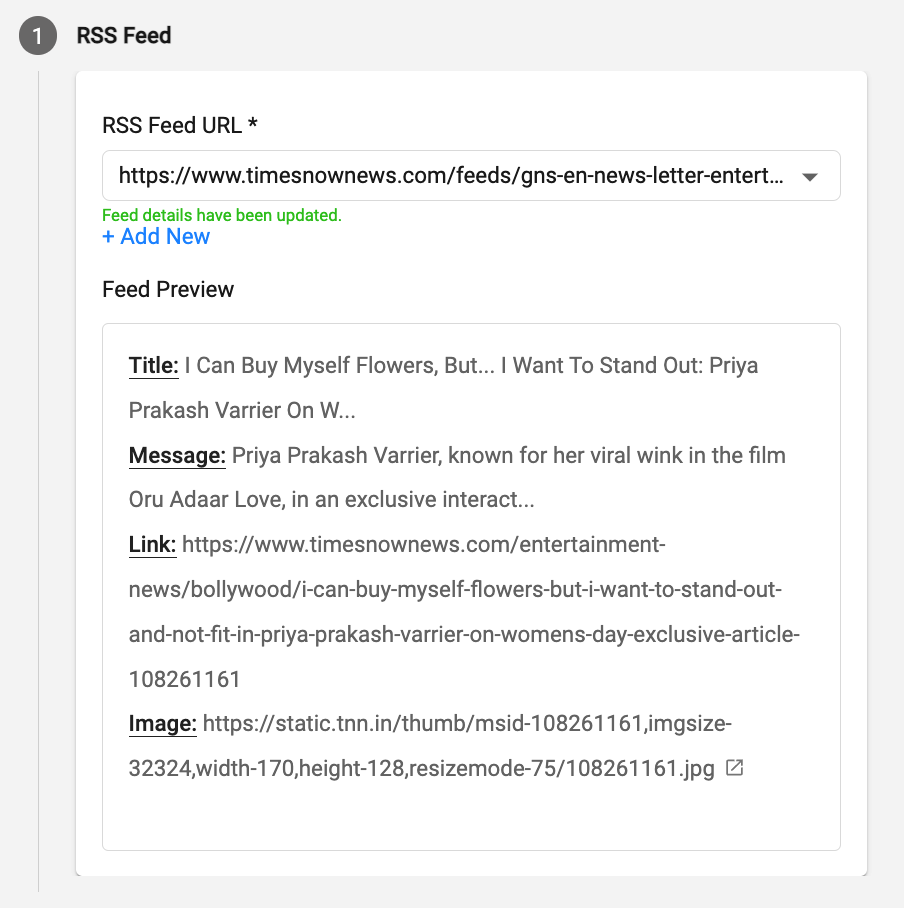
Either select an already connected RSS Feed from the drop-down or click Add New to connect a new feed. To see feeds in the drop-down, you will need to connect them from the RSS Feeds section under the Settings > Setup page. Refer to RSS Feeds Setup guide for details.
If the feed is valid, you will see the list of articles available in the feed in descending order of published date and time, this means, the latest article will be shown at the top.
The Title, Message, Link, and Banner Image as shown below the feed would be used while setting up the notification content.
Step 4
Enter the missing fields in the Setup section.
4.1 The Title, Message, Landing Page URL and Banner Image are picked up automatically from the RSS feed. These fields cannot be modified. In case any of the fields are not available, they will not be shown in the notification.
4.2 The Icon for the notification can be customized to your website logo or any other icon that you would like to use with the notifications. This needs to be set up just once and all the notifications with this RSS feed will be sent with the same icon that is set.
If no icon is set, then a bell icon will be shown for all notifications by default.
4.3 You can also add a couple of CTAs to each of the notifications with their own landing URLs. This also needs to be set up once and all notifications will be sent with the CTAs set here.
4.4 A basic preview of how the notification will look is shown on the right. Please note that every device and every browser shows notifications in their own way and the preview shown is a basic view of how a notification might look.

Step 5
Set up the Advanced Settings
You can set up the Notification Badge, Notification Expiry, Notification Stickiness, UTM Parameters, etc. under this option. All these settings also need to be configured just once and they will be applied to all the notifications sent using this RSS feed.

Step 6
Configure the Timing of the Notifications
Provide the Start Time, the End Time and the time between two notifications.
- The Start Time defines when the first notification would be sent.
- The End Time defines when the last notification would be sent.
- The time between notifications can be set to either Minutes or Hours. By default, this would be set as 15 minutes and can be changed as per requirement.

Points to Note:
- The Start Time and the End Time would be picked up in the same time zone as that set in your iZooto Account under the My Profile section.
- The minimum time between notifications that can be set is 15 minutes and the maximum time is 23 hours.
- If no new article is published in the time gap between two notifications, then NO notification would be sent. For example, if the time between notifications is 30 minutes, and no new article is present, the next notification would go after 1 hour (with the new article if any).
Step 7
Save and Publish
Turn the Feed is ON toggle On and click on Save & Exit to publish the feed and start sending out notifications.

Done!
RSS Auto Push has been configured for your website.
You will be redirected to the RSS Automation home page when the details are saved and you will start seeing the notification data once notifications start going out. Please note that based on the timing inputs provided at the time of configuration, it might take up to 1 hour for the initial stats to start appearing on the dashboard.

As shown in the above image, you can also Edit any existing RSS feed by clicking on the Edit icon. You can modify the same fields which you were able to set at the time of the initial configuration, namely, Icon, Badge, UTM Parameters, etc. You cannot modify or delete the Feed URL once configured.
You can also turn off the RSS Automation by turning the toggle OFF for any particular feed.
Further, multiple feeds can be configured with a single domain by clicking Connect RSS Feed at the top right and following the same steps as mentioned above.
Points to Note:
- Same RSS feed cannot be configured multiple times either with the same website or a different website.
- Notifications sent via RSS Automation will be broadcast notifications, which means, the notifications will be sent to the entire subscriber base.
- Notifications sent via RSS Automation will count towards your Daily Push Campaign limit.
Analytics
After an RSS feed is linked and configured, you will be able to see the cumulative stats on the RSS Automation home page on the iZooto panel.

You can see the Last Sent Date & Time, the cumulative number of Sends and the cumulative number of clicks for all the notifications sent with any RSS feed.
Click on the Feed Name to see the detailed data.
At the top, you will be able to see the Timing configuration that you have set like the Start Time, End Time, Time between Notifications, etc.

Below this, you can see the individual campaign-wise data like the number of sends, number of clicks, CTR, etc. for a particular campaign.

Updated over 2 years ago