Android SDK Setup
Welcome to the iZooto Android SDK setup guide, designed to help you quickly and seamlessly integrate push notifications into your Android app. In this guide, we’ll show you how to add the iZooto Android Mobile App SDK to your Android App.
Overview
Android push notifications are essential for driving sustained user engagement and retention in your Android app. They empower you to deliver real-time notifications directly to your users, improving the overall user experience and stickiness of your app.
iZooto leverages Firebase Cloud Messaging (FCM) as its backbone, providing a powerful and flexible platform for managing push notifications. With iZooto, you get enhanced targeting, advanced segmentation, and detailed analytics to maximize the impact of your notifications, as demonstrated in this integration guide.
Requirements
- Android 7.0+ device or emulator with "Google Play Store (Services)" installed.
- Android Studio (setup instructions use Android Studio Meerkat).
- Configured iZooto account.
Follow the steps mentioned below.
Step 1: Prerequisites
- Your iZooto App ID. You can find it under Settings > General in your account.
- Google/Firebase Service Account JSON
google-services.jsonfile should already be added to your project. [Learn More.]
Step 2: Add iZooto Dependencies
2.1 Open your build.gradle.kts (Module: app) or build.gradle (Module: app) file, add/modify the following lines of codes
android {
 defaultConfig{
    manifestPlaceholders = [
     	izooto_app_id : 'YOUR_iZOOTO_APP_ID_HERE'
  		]
	}
}
android {
  defaultConfig {
    manifestPlaceholders["izooto_app_id"] = "YOUR_iZOOTO_APP_ID_HERE"
  }
}
The iZOOTO_APP_ID will be available on the iZooto panel once you have submitted the FCM details.
Refer to our guide on how to do this.
2.2 Add the following lines of code to the dependencies section:
dependencies {
    implementation 'com.izooto:android-sdk:3.3.2'
    implementation 'androidx.work:work-runtime:2.9.0'

    // Firebase (BoM ensures consistent versions)
    implementation platform('com.google.firebase:firebase-bom:29.0.2')
    implementation 'com.google.firebase:firebase-messaging'

    // Use the below library only if you're using Pulse feature
    implementation 'androidx.browser:browser:1.8.0'

    // Use the below libraries only if you would like to implement Google One Tap in your app
    implementation 'androidx.credentials:credentials:1.2.1'
    implementation 'androidx.credentials:credentials-play-services-auth:1.2.1'
    implementation 'com.google.android.libraries.identity.googleid:googleid:1.1.0'
}
Sync Gradle
Make sure to press "Sync Now" on the banner that pops up after saving!
Android 15 Supported!!
Our latest Native SDK (1.5.9 and above) now supports versions till Android 15 and also includes support for Power Push.
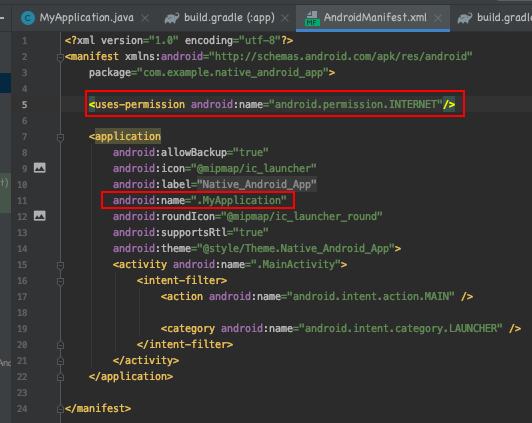
Step 3: AndroidManifest.XML Changes
3.1 Open AndroidManifest.xml and add the following lines of code inside the manifest tag:
// REQUIRED FOR INTERNET PERMISSIONS
<uses-permission android:name="android.permission.INTERNET"/>

// REQUIRED FOR PUSH NOTIFICATION PERMISSION FOR ANDROID 13
<uses-permission android:name="android.permission.POST_NOTIFICATIONS"/>

3.2 Add the following lines of code inside the application tag:
<application
   android:name=".MyApplicationName" > // Change this to your Application Class
</application>

Step 4: Initialize iZooto in the Main Application Class
4.1 Add the following to the onCreate method in your Application class.
import com.izooto.iZooto;

public class MyApplicationName extends Application {
  @Override
  public void onCreate() {
    super.onCreate();

    // iZooto Initialization
    iZooto.initialize(this).build();
   // If your project already includes a notification permission prompt, replace it with this improved method.
    iZooto.promptForPushNotifications();
  }
}
import com.izooto.iZooto

class MyApplication:Application(){
    override fun onCreate() {
     super.onCreate()

     // iZooto Initialization
      iZooto.initialize(this).build()
    // If your project already includes a notification permission prompt, replace it with this improved method.
      iZooto.promptForPushNotifications()

    }
   }
Step 5: Run and Test your app
Run your app on an Android 7.0+ device or the Android emulator to make sure your device is subscribed to notifications and can receive notifications sent from the iZooto dashboard.
Make sure that you have configured your FCM Service Account JSON corresponding to your Android Project on iZooto.
Step 6: Customize what your app does when a notification is clicked or received (Optional)
Notification Listeners
setTokenReceivedListener - This will be called when a notification token is received.
onNotificationReceived - This will be called when a notification is received.
onNotificationOpened - This will be called when a notification is tapped on.
Step 7: Programmatically Triggering the Native Permission Prompt (only for Android 13 and above)
Refer to the iZooto Android 13 Push Notification Developer Update Guide to understand the changes needed to be done in your app to provide support for push notifications if your app has started supporting Android 13 (API level 33) or higher.
Updated 4 days ago
