Generate an iOS .p12 Push Certificate
A step-by-step guide to create an iOS (APNS) Push Certificate.
For iOS Apps, not websites
This guide is for developers implementing iZooto in an iOS application for distribution on Apple's App Store. This guide should not be used for Web Push.
An iOS Push Certificate is required for notification delivery to all iOS apps.
Step 1 - Requirements
- An iOS mobile app. (This is not for websites / web push)
- A Paid Apple Developer Account with Admin Role.
- An iZooto Account, if you do not already have one.
- A Mac computer with Xcode 11+
- Your Xcode project should have the Push Notification capability added. Otherwise, your project may not be shown in the Apple Developer Center.
Step 2 - Provisioning
2.1 Generate Certificate Request File
Open the Keychain Access app on your Mac OS X system. By default, it will be located in Applications > Utilities > Keychain Access.
Select Keychain Access > Certificate Assistant > Request a Certificate From a Certificate Authority.
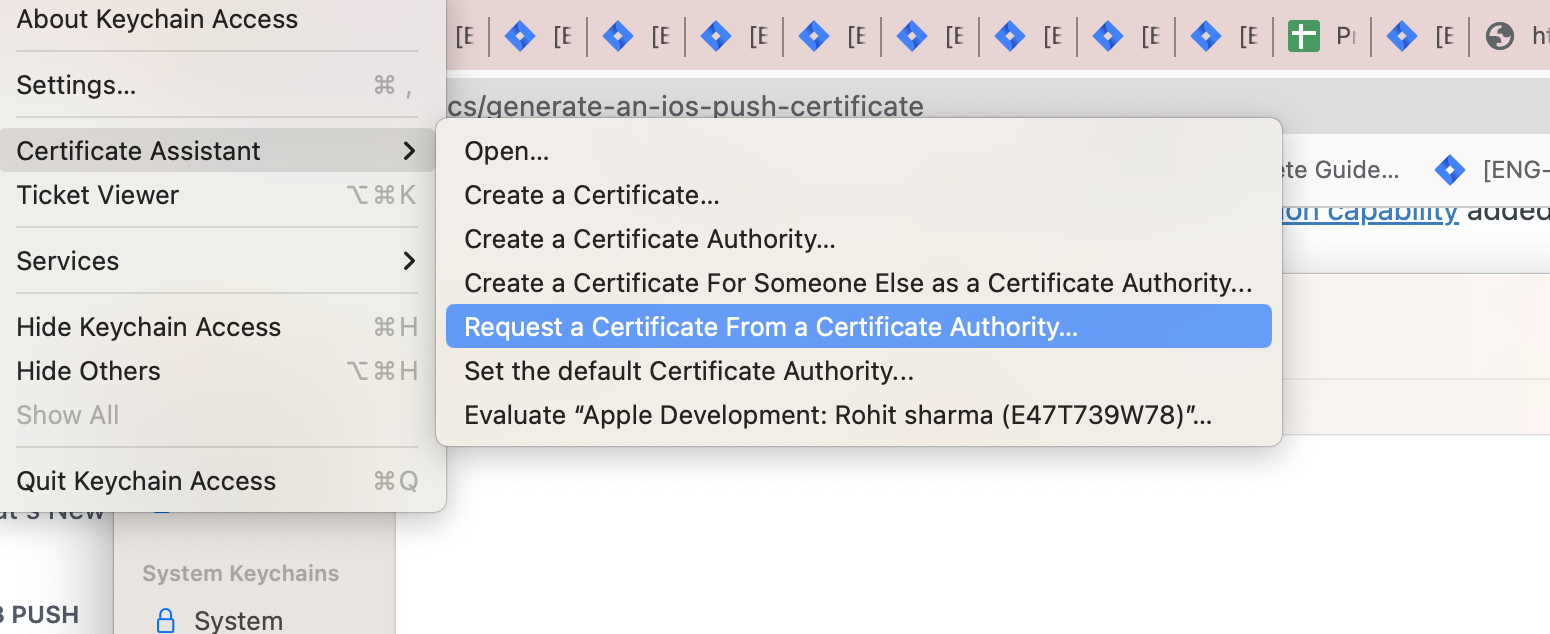
Next, select the Save to disk option and enter your information in the required fields. This creates a certification request file that will be used later.

2.2 Add iZooto Identifier
Select your Identifier in your Apple Developer Account under Certificates, Identifiers & Profiles > Identifiers

Scroll down to the bottom and enable Push Notifications for your identifier.

Next, go to Certificates and create a new certificate by clicking the blue + (plus) button.
Under Services, select Apple Push Notification service SSL (Sandbox & Production) and click Continue.
The certificate will be applicable to both Sandbox and Production environments, so you do not need a separate key for each one.

Choose an App ID from the App ID pop-up menu, and click Continue.

Click Choose File, select the CertSigningRequest file you saved in the first step, click Open, and then click Continue.

Click Download to save the certificate to your computer.

2.3 Creating a Private Key
Open the .cer file you downloaded in the last step by double-clicking on it in Finder.

After a few seconds, the Keychain Access program should open. Select Login > My Certificates, then right-click on your key in the list and select Export.

Give the file a unique name using the .p12 extension, and click Save. You will have an option to protect the file with a password.
2.4 Converstion to .pem
.pemNavigate to your certificate directory in the terminal and execute the following command.
openssl pkcs12 -in YOUR_CERTIFICATE_NAME.p12 - out YOUR_CERTIFICATE_NAME.pem -nodes
You will now have a cert.pem and cert.p12 file.
Step 3 - Configure your iOS App with iZooto
Once you have the APNS .p12 certificate, proceed to add your iOS app to your iZooto account.
Done!
You now have a certificate to send push notifications from your iOS app.
If you have not already done so, proceed to install the iZooto SDK in your app.
Updated about 3 years ago